Microscopy ...the embiggening of the brain
There are three types of microscope available in the lab for examining your slides: The Bausch & Lomb Microprojector, The Wild macroscope, and the Zeiss compound light microscope with epifluorescence option. This document is not designed to serve as a comprehensive instruction set on any of these microscopes, rather it is intended to provide a few tips to those who have a nodding acquaintance with microscopes.
The Microprojector
Microprojectors are used to scan through your microscope slides and make paper tracings of critical sections. The operation of the microprojector is self evident.
- Magnification is a function of the objective selected and the distance that the image is projected. An estimate of the magnification can be obtained by projecting a transparent ruler under the same conditions that the microscope slide was projected.
- Coverslipped side of the slide should go down. Coverslips always face the objective.
- When microprojector bulbs were discontinued, the microprojectors were converted to use halogen bulbs. These bulbs cause much more fading of stained slides. Avoid long exposure whenever possible.
- Some of the microprojectors are fitted with a mirror to allow projection onto a wall for teaching purposes. The head of the microprojector can also be tipped back to do this, but it is less convenient.
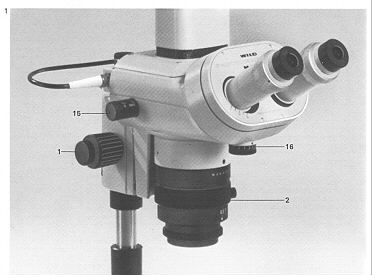
Macroscope
The macroscope is used for low power examination of sections and low power photography. The basic operation of the scope is straight forward. Turn on the light, place the slide under the macrozoom objective and focus.
- Adjust the interpupillary distance to suit your eyes, by gently increasing or decreasing the distance between the eye pieces until you have a single circular field of view.
- The little knob beneath the eye pieces (16) is the control knob for the aperture diaphragm. The higher the aperture, the better the resolution. The depth of field, however, decreases with increasing aperture. At the left hand mark on the scale, the aperture is fully open.
- There is an additional 2.0X objective screwed in to the end of the macrozoom objective. Removing this objective will increase the field of view and increase the working distance from 42 to 102 mm.
- The knob to the left of the
eyepieces controls the beam splitting prism which directs the image to the
eyepieces(
Macroscope Photography
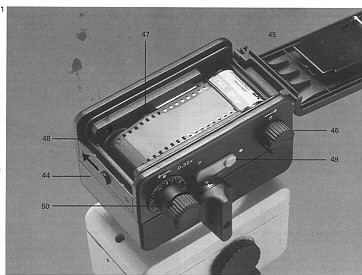 Loading
the Camera
Loading
the Camera - Insure lever(49) points to the white spot.
- Push catch(44) left, open cover.
- Pull out rewind knob(46),insert film, and push rewind knob back in.
- Turn film transport drum(47) to the left using the teeth until the take-up spool(48) and film transport knob(50) move with it.
- Depress transport release lever(49). Turn film transport knob(50) CCW until the slit on the take-up spool faces up.
- Pull the film over the transport drum(47) and insert the end into the slit of the take-up spool.
- Turn film transport knob(50) CCW until stop is reached. Depress transport release lever(49) and advance film 1 frame. Drum(47) must engage both pines of perforation on the film.
- Close cover.
- Set the line between 35 & 1 on the automatic film counter.
- Advance film by 2 more frames, first pressing the transport release lever(49) each time. Film counter should point to 1.
- Removing Film
- Swing transport release lever(49) to vertical position.
- Unfold crank of rewind knob(46) and turn clockwise until there is no resistance to turning.
- Fold up crank and switch transport release lever(49) to white spot.
- Push catch(44) left to open magazine cover.
- Pull out the rewind knob(46) and remove film cartridge.
- Dioptric Correction
- Without introducing a slide, illuminate the field of view.
- With the eyepiece with graticule
- Without looking into it, turn the lens of the eyepiece to "+5".
- Look through the eyepiece and turn the lens slowly towards "-5" until the vertical of the crosshair is clearly seen as a double line.
- Select the highest magnification.
- Focus on a flat object (cross marked on paper) with the focusing drive.
- With the eyepiece without graticule
- Set to the lowest magnification.
- Without looking into it, turn the lens of the eyepiece to "+5".
- Turn the lens slowly towards "-5" until you see the object in sharp focus.
- At the highest magnification, use both eyes to inspect image sharpness. If necessary refocus with focussing drive, but do not redjust eyepieces.
- Taking Pictures
- Turn on Photoautomat.
- Enter film speed using ASA/DIN key.
- Press MODE key until "AUTO" LED is lit.
- Focus on slide and move slide until your object if framed well in the graticule.
- Using the beam splitting prism control knob, send the light to the camera (PHOT 100%).
- Depress the EXPO key.
The Compound Microscope
The compound microscope is used for higher magnification examination of slides. This microscope is outfitted for epifluorescence microscopy as well as transmitted light photography. There is a camera mounted on this microscope. Proper operation of this microscope is a skill that must be beaten in to you and is, therefore, beyond the scope of this document. This document will provide a few tips, but is not a substitute for proper instruction.
- Kohler Illumination In order to get the best image from the microscope, it is critical that the light path be set up properly. The method for doing this is called Kohler Illumination.. Proceed as follows:
- Turn on the microscope and place a microscope slide on the stage.
- Using the coarse and fine focus knobs, focus on the tissue.
- Close down the iris of the field diaphragm at the base of the microscope.
- Slowly start lowering the condenser using the condenser focusing knob until the edges of the diaphragm are in sharp focus along with the tissue.
- If the iris is not centered in the field of view, center it using the two screws located near the back on each side of the condenser carrier.
- When the light is centered, close down the iris aperture on the condenser until the area outside the light field is evenly dark.
- Open up the iris of the field diaphragm until the edges of the iris are just out of view.
- Measurement
To take measurements of objects in your field of view, such as cell bodies or pipette tips you need an eyepiece with a built in graticule. The graricule must be calibrated for each objective that you use. Proceed as follows:
- Place a stage micrometer in the slide holder on the stage.
- Using the left/right and anterior/posterior specimen moving knobs,move the stage micrometer until the ruler is in the center of the field of view. A typical micrometer might have a 1 mm ruler marked off in 5 or 10 µm divisions.
- Insure that the micrometer is in sharp focus.
- Turn the eyepiece with the graticule until the graticule overlaps the stage micrometer.
- Use the micrometer to calibrate your eyepiece graticule. Example: If it takes 80 divisions in the eyepiece graticule to cover 1 mm of the micrometer, then each division on the graticule is 1/80 mm or 12.5 µm.
- Photography
- Focus on your slide in the normal way.
- Center your picture in the inner rectangle of the eyepiece graticule.
- Set the film speed
(the ASA number is found on the film pack). Using the large dial on the
left of the MC63 unit, turn the dial until film speed lines up with the
small rectangle located at about
- Set the large dial at the right to "AUTO".
- Pull out the knob located to the right of the eyepieces to allow light to travel to camera.
- Press "EXP" button.
- Digital Photography
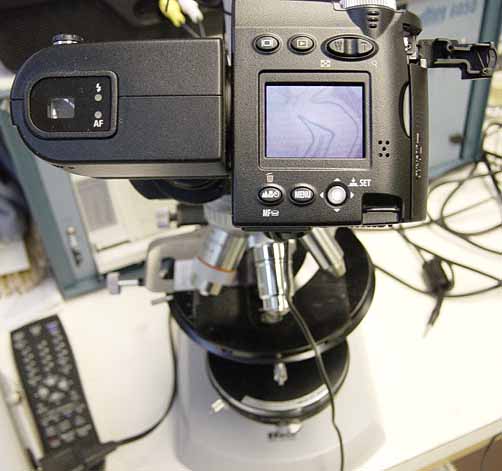 The lab has recently acquired a
digital camera. A microscope eyepiece was machined to screw into the camera in
the same way an optional camera lens would. The camera can now be used to take
pictures through the microscope without an expensive c-mount adaptor by simply
sliding the camera into one of the eyepiece tubes.
The lab has recently acquired a
digital camera. A microscope eyepiece was machined to screw into the camera in
the same way an optional camera lens would. The camera can now be used to take
pictures through the microscope without an expensive c-mount adaptor by simply
sliding the camera into one of the eyepiece tubes.
In the image at the right you can see the camera in operation. The image of the
specimen appears on the camera display.
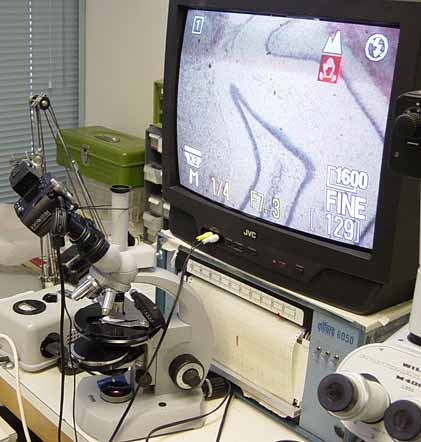
The image can also be routed to a TV monitor as seen in the image below. This
makes the camera an excellent teaching tool.
When taking photos, you can gain greater control of the picture by setting the
camera in manual mode.
Last
modified: